Windows 7 Network Sharing | |
| 1. | To share a particular folder with Windows 7, right click on the folder |
| 2. | Select Share with |
| 3. | Select the type of sharing you want to have |
| 4. | In the following example, I will select Specific People |
 | |
| 5. | Click on Advanced Sharing |
 | |
| 6. | Click on Share this folder and give it a share name |
 | |
| 7. | Click on Permissions |
| 8. | Enter in the user permissions you want to allow |
 | |
Showing posts with label PC ဗဟုသုတ. Show all posts
Showing posts with label PC ဗဟုသုတ. Show all posts
Saturday, June 27, 2015
Windows 7 Network Sharing

Thursday, March 20, 2014
ကြန္ျပဴတာအသစ္တလံုးအတြင္းသို႔ MICROSOFT OFFICE PROFESSIONAL PLUS 2010 ထည့္သြင္းနည္းအဆင့္ဆင့္

Miscrosoft Office ကို ဘေလာ့ တိုင္းမွာ တင္ေပးေနၾကပါတယ္။ ဘာျဖစ္လို႔လည္းဆိုေတာ့ ဝင္းဒိုးကြန္ျပဴတာ တိုင္းအတြက္ အရမ္းအသံုးဝင္တဲ့ ေဆာ့ဝဲ မို႔ လူတိုင္း စက္တိုင္းေလာက္နီးပါး အသံုးျပဳ႕ၾကပါတယ္။ အသစ္အသစ္ေတြလည္းအမ်ားႀကီး ထြက္လာေနတယ္ အခု႔ဆိုရင္Office 2013
ေတာင္ထြက္ေနပါၿပီအသံုးလည္းျပဳ႕ေနၾကပါတယ္။အခု႔ဒါေလးကေတာ့အေဟာင္းပါ။အသံုးျပဳ႕ရတာရိုးရွင္း
ၿပီးေတာ့ Crack လုပ္ရတာလည္း အ၇မ္းလြယ္ကူတဲ့အတြက္ က်ေနာ္ ဆိုဒ္မွာလည္း အၿမဲတမ္း တင္ေပးခဲ့ပါ
တယ္။တင္ေပးရင္းတင္ေပးရင္းနဲ႔ လင့္ေတြကေသေသသြားလို႔ အသစ္ျပန္ upload ေပးေနရတယ္။
အခု႔ဒီတခါေတာ့ 100 MB စီနဲ႔ ၆ ဖိုင္ 49 MB နဲ႔ ၁ ဖိုင္ အားလံုး 7 ဖိုင္ကို လင့္ ၂ ခု႔ကေန ျပန္တင္ေပးလိုက္
ပါတယ္.အထဲမွာလည္းCrackဖိုင္တခါတည္းပါၿပီးသားျဖစ္တဲ့ အျပင္ Activate လုပ္တည္းနဲ႔ installလုပ္နည္း
ကိုလည္း ပံုေလးေတြနဲ႔ ရွင္းျပထားေပးပါတယ္။ ပံုေတြ ဘာလို႔ အားျဖည့္ထားသလည္း ဆိုေတာ့ ယခု႔မွစၿပီး
ကြန္ျပဴတာ သံုးမယ့္ သူေတြအတြက္ လြယ္လြယ္ကူကူ အသံုးျပဳ႕ႏိူင္ေအာင္ အတြက္ရည္ရြယ္ၿပီးေတာ့
ထပ္ထည့္ေပးထားတာပါ။ေဆာ့ဝဲ ကိုေတာ့ ေအာက္မွာဝင္ေဒါင္းၿပီး Install လုပ္နည္း အဆင့္ဆင့္ကိုေတာ့
ေအာက္မွာ ထပ္ေလ့လာလိုက္မယ္ဆိုရင္ သေဘာေပါက္နားလည္ပါလိမ့္မယ္။
ေတာင္ထြက္ေနပါၿပီအသံုးလည္းျပဳ႕ေနၾကပါတယ္။အခု႔ဒါေလးကေတာ့အေဟာင္းပါ။အသံုးျပဳ႕ရတာရိုးရွင္း
ၿပီးေတာ့ Crack လုပ္ရတာလည္း အ၇မ္းလြယ္ကူတဲ့အတြက္ က်ေနာ္ ဆိုဒ္မွာလည္း အၿမဲတမ္း တင္ေပးခဲ့ပါ
တယ္။တင္ေပးရင္းတင္ေပးရင္းနဲ႔ လင့္ေတြကေသေသသြားလို႔ အသစ္ျပန္ upload ေပးေနရတယ္။
အခု႔ဒီတခါေတာ့ 100 MB စီနဲ႔ ၆ ဖိုင္ 49 MB နဲ႔ ၁ ဖိုင္ အားလံုး 7 ဖိုင္ကို လင့္ ၂ ခု႔ကေန ျပန္တင္ေပးလိုက္
ပါတယ္.အထဲမွာလည္းCrackဖိုင္တခါတည္းပါၿပီးသားျဖစ္တဲ့ အျပင္ Activate လုပ္တည္းနဲ႔ installလုပ္နည္း
ကိုလည္း ပံုေလးေတြနဲ႔ ရွင္းျပထားေပးပါတယ္။ ပံုေတြ ဘာလို႔ အားျဖည့္ထားသလည္း ဆိုေတာ့ ယခု႔မွစၿပီး
ကြန္ျပဴတာ သံုးမယ့္ သူေတြအတြက္ လြယ္လြယ္ကူကူ အသံုးျပဳ႕ႏိူင္ေအာင္ အတြက္ရည္ရြယ္ၿပီးေတာ့
ထပ္ထည့္ေပးထားတာပါ။ေဆာ့ဝဲ ကိုေတာ့ ေအာက္မွာဝင္ေဒါင္းၿပီး Install လုပ္နည္း အဆင့္ဆင့္ကိုေတာ့
ေအာက္မွာ ထပ္ေလ့လာလိုက္မယ္ဆိုရင္ သေဘာေပါက္နားလည္ပါလိမ့္မယ္။
DOWNLOAD FROM MILOSHARE(649.4 MB)
OFFICE 1 | OFFICE 2 | OFFICE 3 | OFFICE 4 |
OFFICE 5 | OFFICE 6 | OFFICE 7
DOWNLOAD FROM DEV-HOST(649.4 MB)
OFFICE 1 | OFFICE 2 | OFFICE 3 | OFFICE 4 |
OFFICE 5 | OFFICE 6 | OFFICE 7

အေပၚက ပံုမွာျပထားတဲ့အတိုင္း ေဒါင္းလို႔ရလာတဲ့ ဖိုင္ထဲက Part 1 ကို ကလစ္ ၂ ခ်က္ေခါက္ၿပီး
install လုပ္ရပါမယ္။အပိုင္း 7 ပိုင္း ရွိေပမယ့္ အပိုင္း ၁ ခု႔ ကို ျဖည္လိုက္တာနဲ႔ တျခားဖိုင္ေတြကိုလည္း
ေအာ္တို ျဖည္သြားမွာပါ။တခု႔ သတိထားရမွာကေတာ့ ေဒါင္းစဥ္တုန္းက ဖိုင္ေေတြကို တေနရာထဲမွာ
သိမ္းထားေပးပါ။

ပံုမွာေရးထားတာေတြကို ေျပာျပမယ္ေနာ္
1။ ဖိုင္ ကို ကလစ္ ၂ ခ်က္ ေခါက္ၿပီး ဖြင့္လိုက္ပါ။
2။ setup.exe ေလးကို ထပ္ၿပီးေတာ့ ကလစ္ ၂ ခ်က္ေခါက္လိုက္ပါ
3။ကေတာ့ install လုပ္ေနပါၿပီ ခဏ ေစာင့္ေပးပါ

အေပၚက ပံုအတိုင္းေပၚလာၿပီဆိုရင္
1 ။ အမွန္ျခစ္ေလးေပးၿပီး လိုင္စင္သေဘာတူညီမႈ႕ေလးကို ယူလိုက္ပါ
2 ။ Continue ကိုႏွိပ္ၿပီးေတာ့ ေရွဆက္သြားပါ

Install Now ကိုႏွိပ္လိုက္ပါ

အေပၚက Install Now ကိုႏွိပ္လိုက္တာနဲ႔ အလုပ္လုပ္ေနပါၿပီ
၁၀ မီးနစ္ ကေန မီးနစ္ ၂၀ အထိၾကာတက္ပါတယ္ နည္းနည္းေစာင့္ၾကည့္ေပးပါ

Install လုပ္တာ ျပည့္စံုသြားၿပီဆိုရင္ အေပၚက ပံုအတိုင္း ေပၚလာမယ္
ဘာမွမလုပ္ပဲ Close ကိုႏွိပ္ခ်လိုက္ပါ

ကဲ အခု႔ Office ကို Activate လုပ္မယ္ေနာ္။ေဒါင္းထားတဲ့ part 1 ဖိုင္စဖြင့္တုန္းက အထဲမွာ
ရွိေနၿပီးသားပါ။ Key Activator ကို ကလစ္ ၂ ခ်က္ေခါက္ၿပီးေတာ့ဖြင့္လိုက္ပါ။
ရွိေနၿပီးသားပါ။ Key Activator ကို ကလစ္ ၂ ခ်က္ေခါက္ၿပီးေတာ့ဖြင့္လိုက္ပါ။

ဖိုင္ပြင့္သြားၿပီဆိုရင္ အထဲ က mini KMS activator ကို ကလစ္ ၂ ခ်က္ေခါက္ၿပီးထပ္ဖြင့္ေပးရပါမယ္။
ပံုထဲကအတိုင္းေလး run ေနပါလိမ့္မယ္ ခဏ ေစာင့္ေပးပါ။

အေပၚက ပံုကေတာ့ Administrator ရဲ႕ ခြင့္ျပဳခ်က္ေတာင္းတာပါ
YES ကိုႏွိပ္ၿပီးဆက္သြားလိုက္ပါ

YES ကိုႏွိပ္လိုက္ၿပီဆိုရင္ အေပၚက ပံု လိုမ်ဳိး ေပၚလာမွာျဖစ္ပါတယ္။
ActivationOffice 2010 VL ကိုေရြးေပးရပါမယ္

ေရြးေပးလိုက္ၿပီဆိုရင္ အေပၚက ပံုအတိုင္း cmd box ေပၚလာမယ္
ေပၚလာရင္ နံပါတ္ 1 ကို ႏွိပ္ေပးရပါမယ္. ႏွိပ္လိုက္တာနဲ႔ Activate လုပ္ေနပါၿပီ.ခဏေစာင့္လိုက္ပါ။
ေပၚလာရင္ နံပါတ္ 1 ကို ႏွိပ္ေပးရပါမယ္. ႏွိပ္လိုက္တာနဲ႔ Activate လုပ္ေနပါၿပီ.ခဏေစာင့္လိုက္ပါ။

ၿပီးသြားၿပီဆိုရင္ ကီးဘုတ္က ႀကိဳက္ရာခလုပ္ႏွိပ္ၿပီးေတာ့ထြက္လိုက္ပါ။ Office ထဲက word ျဖစ္ျဖစ္
Excel တခု႔ျဖစ္ျဖစ္ ဖြင့္လိုက္ပါ။
Excel တခု႔ျဖစ္ျဖစ္ ဖြင့္လိုက္ပါ။

Office ကိုဖြင့္လိုက္လို႔ အေပၚက ပံုအတိုင္းေပၚေနတယ္ ဆိုရင္ အနီေရာင္ေလးေထာင့္ကြက္
ထဲမွာျပထားတဲ့အတိုင္း အမွတ္ျခစ္ေပးလိုက္ၿပီးေတာ့ OK ကိုသြားပါ။
OK ကို ႏွိပ္လိုက္တာနဲ႔ Office ကို လိုင္စင္မေတာင္းပဲနဲ႔ အဆင္ေျပေျပ အသံုးျပဳ႕လို႔ရပါၿပီ
OFFICE 2010 Install လုပ္နည္းေလးကေတာ့ ဒါေလးပါပဲ ခင္ဗ်ာ
ေက်းဇူးအထူးတင္ရွိပါတယ္ခင္ဗ်ာ
ကိုလတ္(ကြ်ဲဆင္း)
Sunday, February 9, 2014
ျမန္မာေဖာင့္အလွေလးေတြပါ၀င္တဲ့ စုစည္းမႈေလးပါ

CE, King, Matrix, Acadamy, Ayar, Art house,
Shwe Thway, U4, U4 Myanmar, အျပင္ အျခား
ေသာ အလွေလးေတြ ဒီဇိုင္းအတြက္ သင့္ေတာမည့္
ေဖာင့္ေလးေတြ စုစည္းပီး တစ္ဖိုင္တည္းတင္ေပး
လိုက္ပါတယ္။ ဖုိင္စိုက္ဒ္ကေတာ့ 15.27 MB တိတိ
ရွိပါတယ္။စီတ္၀င္စားလို႕ေဒါင္းခ်င္သပဆိုရင္ေတာ့
ဘေလာ့ခရီးသည္မွ ကူးယူေဖာ္ျပသည္....
Sunday, February 2, 2014
Files Upload & Sharing with Google Drive (Google Drive မွာ ဖိုင္တင္ျပီး ျပန္ ရွယ္ တဲ့ နည္းေလးပါ။ Gmail အေကာင့္ မပ်က္ သေရြ႕ လင့္မေသ)

ကြ်န္ေတာ့္အေနနဲ႕ ဖိုင္တစ္ခုခုကို Upload တင္ေတာ့မယ္ဆိုရင္ ကိုယ္တင္ထားတဲ့ ဖိုင္ေလးေတြ ေရရွည္ ခံမွာလား၊ စိတ္ခ်ရလား၊ ကိုယ္ Upload တင္ရတာနဲ႕ ေဒါင္းယူမယ့္လူေတြအတြက္ေရာ အားလံုး လြယ္ကူ အဆင္ေျပမွာလားဆိုတာ အျမဲစဥ္းစားပါတယ္။ ဟိုအရင္တုန္းက ကြ်န္ေတာ္ Mediafire ဆိုဒ္ကို သံုးခဲ့တယ္။ ေနာက္ပိုင္း Copyright ျငိတာေတြနဲ႕ ခဏခဏ ဖိုင္ေတြ အဖ်က္ခံရတယ္။
ဥပမာ ေဆာ့ဝဲလ္တစ္ခုကို မူရင္းဆိုဒ္က ေရာင္းစားတယ္။ အဲဒါကို ကိုယ္က Patch ဖိုင္ေတြနဲ႕ တင္တာ၊ Portable လုပ္ျပီး တင္တာတို႕ဆို ဖ်က္ပါတယ္။ တစ္ျခားဖိုင္ေတြဆိုလည္း တစ္ႏွစ္ေလာက္ ပီးရင္ ဖ်က္ပစ္တာပါပဲ။ ဒါက Mediafire ဆုိဒ္တင္ မဟုတ္ပါဘူး။ Free File Hosting တိုင္းလိုလိုပဲ လုပ္ေနႀကတာ။ ေနာက္ Flash Song ေတြ Upload တင္ [ လင့္ခ်ိတ္ ] တဲ့ သူငယ္ခ်င္းေတြ အမ်ားစုက Ning ဆိုဒ္ေတြမွာပဲ သြားျပီး လုပ္ေနႀကတာပါ။
ခုေနာက္ပိုင္း Ning ဆိုဒ္ေတြဆို အမ်ားႀကီးကို ေပၚလာေနပါတယ္။ လင့္ခ်ိတ္တဲ့လူေတြကလည္း အလြယ္တစ္ကူပါပဲ။ ေနာက္ အဲဒီဆိုဒ္က အေႀကာင္းအမ်ဳိးမ်ဳိးေႀကာင့္ ဆိုဒ္ပ်က္သြားခဲ့ရင္ ကိုယ္တင္ထားတဲ့ လင့္ေတြက အလုပ္ မလုပ္ေတာ့ပါဘူး။ ျပီးေတာ့ ကိုယ္ အဲဒီဆုိဒ္ကို မဝင္ခ်င္ေတာ့လို႕ အျပီးထြက္ရင္လည္း လင့္ေတြ ပ်က္ပါတယ္။
Google Drive မွာ ကြ်န္ေတာ္တို႕ Blogger ေတြ၊ Flash Song Creator ေတြအားလံုး အတြက္ ေဆာ့ဝဲလ္ေတြနဲ႕ ဖလပ္သီခ်င္းေတြ Mp3 သီခ်င္းေတြ၊ ပံုေတြ၊ PDF ဖိုင္ေတြ နဲ႕ တစ္ျခား ဖိုင္ေတြအားလံုးကို အြန္လိုင္းေပၚမွာတင္ သိမ္းဆည္းျပီး ျပန္လည္မွ်ေဝဖို႕ကို သင့္အေနနဲ႕ Gmail အေကာင့္ တစ္ခု ရွိရံုနဲ႕ 15 GB အထိ Upload လုပ္ႏိုင္ပါတယ္။
.zip .rar နဲ႕ ခ်ဳံ႕ထားတဲ့ ဖိုင္ေတြဆိုရင္ လင့္ကို တစ္ခ်က္ႏွိပ္လိုက္ရံုနဲ႕ ေဒါင္းလုပ္က်ျပီး Flash Song ေတြရင္လည္း လိုင္းေပၚမွာတင္ နားေထာင္လို႕ရပါတယ္။ Download အတြက္ ေပးခ်င္တယ္ ဆိုရင္လည္း လင့္တစ္ခုနဲ႕တင္ ရပါျပီ။ MP3 သီခ်င္းေတြဆိုရင္လည္း ေဒါင္းလုပ္ေပးလို႕ရတယ္။ Flash Mp3 Player ေတြနဲ႕ ကုတ္ထည့္ျပီး တင္လို႕ရတယ္။
ကိုယ့္ဝဘ္ဆုိဒ္မွာ အသံုးျပဳဖို႕ .css , .js ဖိုင္ေတြကိုလည္း ကုတ္နဲ႕ထည့္ျပီး သံုးလို႕ရတယ္။ html ဖိုင္ေတြကိုလည္း လိုင္းေပၚမွာတင္ ႀကည့္လို႕ရပါတယ္။ ဒီေတာ့ ကြ်န္ေတာ္တို႕အတြက္ Google Drive ထက္ေကာင္းတာ ဘာရွိဦးမလဲ။ Google Drive ဆိုတာ www.google.com ကို သြားလုိက္ရင္ Gmail ရဲ႕ ညာဘက္မွာ ရွိပါတယ္။

ကြ်န္ေတာ္တို႕ လိုခ်င္တာေတြ ရွာဖို႕ Search , Images ရွိတယ္။ ဖုန္းမွာ သံုးဖို႕ ေဆာ့ဝဲလ္ေတြ ဂိမ္းေတြ ေဒါင္းဖို႕က Play ရွိတယ္။ Video ဖိုင္ေတြ ႀကည့္ခ်င္ရင္ YouTube သြားေပါ့။ Gmail ဆိုတာကေတာ့ အထူးမိတ္ဆက္ေပးစရာမလိုဘူး ထင္တာပဲ။
လူတိုင္းမွာ Gmail အေကာင့္ ၁ ကေတာ့ အနည္းဆံုးရွိတာပဲေလ.. Google ဆိုတာ ကြ်န္ေတာ္တို႕ အတြက္ အြန္လိုင္းေပၚမွာ လိုအပ္တာေတြ အားလံုးကို ျဖည့္ဆည္းေပးေနတဲ့ ကမာၻေက်ာ္ ဝဘ္ဆုိဒ္ပါ။ အဲဒီေတာ့ သင္ယံုႀကည္ စိတ္ခ်စြာနဲ႕ Google Drive ကို အသံုးျပဳႏိုင္ပါတယ္။
ဖိုင္ေတြကို Upload တင္မယ္ဆိုရင္ ပထမဦးဆံုး ဒီကေန သြားျပီး သင့္ Gmail အေကာင့္နဲ႕ Sign In လုပ္ပါ။ အဲဒါဆို ဒီစာမ်က္ႏွာကို ေရာက္လာပါလိမ့္မယ္။ ဖိုင္ေတြကို Folder တစ္ခုစီ လုပ္ထားတာ ပိုေကာင္းပါတယ္။ ျပီးရင္ ေဆာ့ဝဲလ္ ဒါမွ မဟုတ္ Flash Song ၊ ကိုယ္တင္ခ်င္တာကို Upload တင္ပါ။

ကိုယ္ Upload တင္ထားတဲ့ ဖိုင္ေတြကို ရွယ္တဲ့ ေနရာမွာ ကိုယ္ကဖိုင္ေတြကို တစ္ခုခ်င္းစီ ရွယ္မယ္ဆို လည္း ရပါတယ္။

Folder တစ္ခုလံုး ရွယ္ခ်င္တယ္ဆိုလည္း ရပါတယ္။ ကြ်န္ေတာ္ကေတာ့ Folder တစ္ခုလုံး ရွယ္ပါတယ္။ အဲဒါက ကိုယ့္အတြက္ေရာ ေဒါင္းတဲ့သူ အတြက္ပါ ေကာင္းပါတယ္။ ဒါကေတာ့ ကိုယ့္စိတ္ သေဘာ အတိုင္းေပါ့ေနာ္..

ခုလိုမ်ဳိးေပၚလာျပီဆိုရင္ Change... ကို ႏွိပ္ပါ။

အေပၚဆံုးက Public on the web ကို ေရြးျပီး Save လုပ္လုိက္ပါ။

အနီေရာင္နဲ႕ ဝိုင္းျပထားတဲ့ လင့္ကို ေကာ္ပီ ယူလိုက္ပါ။

ဒါက Flash Songs Folder တစ္ခုလံုး ရွယ္ထားတဲ့လင့္ပါ။
https://drive.google.com/folderview?id=0B2_DQmuprDoidnJiOWo4NGs1SzQ&usp=sharing
ဒါကFlash Song တစ္ပုဒ္ပဲ ရွယ္ေပးထားတာပါ။
https://docs.google.com/file/d/0B2_DQmuprDoiUHVubW9LSWtJNE0/edit?usp=sharing
အနီေရာင္နဲ႕ ျပထားတာက ရွယ္ထားတဲ့ ဖိုင္ရဲ႕ id ပါပဲ..။ လင့္ကို ေအာက္ပါ အတိုင္း ေျပာင္းလိုက္ပါ။
https://googledrive.com/host/ဒီေနရာမွာ ဖိုင္ id ထည့္ပါ...
ကြ်န္ေတာ္ ေအာက္မွာ လုပ္ျပထားပါတယ္။
https://drive.google.com/folderview?id=0B2_DQmuprDoidnJiOWo4NGs1SzQ&usp=sharing
https://googledrive.com/host/0B2_DQmuprDoidnJiOWo4NGs1SzQ
-------------------------------------------------------------------------------------------------------
https://docs.google.com/file/d/0B2_DQmuprDoiUHVubW9LSWtJNE0/edit?usp=sharing
https://googledrive.com/host/0B2_DQmuprDoiUHVubW9LSWtJNE0
ဒီနည္းအတိုင္း ဖိုင္ကို လင့္ေျပာင္းလိုက္ရင္ .zip .rar နဲ႕ ခ်ဳပ္ထားတဲ့ ဖိုင္ဆိုရင္ တစ္ခါတည္း ေဒါင္းလုပ္ က်ပါတယ္။ Flash Song ဆိုရင္ လိုင္းေပၚမွာတင္ နားေထာင္လို႕ ရတယ္။ မူရင္းလင့္ကို ေဒါင္းလုပ္ေပး မယ္ဆုိ တစ္ခ်က္ခုတ္၊ ႏွစ္ခ်က္ျပတ္ လင့္တစ္ခု တည္းနဲ႕တင္ ေတာ္ေတာ္ အဆင္ေျပေနပါျပီ။
Upload တင္ထားတဲ့ ဖိုင္ေတြကို ရွယ္တဲ့ေနရာမွာ ဖိုင္ တစ္ခုစီရွယ္မယ္ဆိုရင္ အခ်ိန္အမ်ားႀကီးေပးရ ပါလိမ့္မယ္။ ဒါ့ေႀကာင့္ Folder တစ္ခုလံုးကို ရွယ္လိုက္ျပီး လင့္ကို ဖြင့္လိုက္။ ကိုယ္တင္ေပးခ်င္တာကို Right Click >> Copy Link Loction လုပ္ျပီးေတာ့ တင္လိုက္ရံုပါပဲ....။

ကြ်န္ေတာ္ Google Drive က တင္ထားတာေလးေတြကိုေတာ့ ေအာက္မွာ လင့္ေပးထားပါတယ္။
Software >> https://googledrive.com/host/0B-qdXDrTpme3c3N1cG1oNENFSU0/
Flash Songs >> https://googledrive.com/host/0B-qdXDrTpme3SFhfUExZRkttWGc/
Software >> https://googledrive.com/host/0B-qdXDrTpme3c3N1cG1oNENFSU0/
Flash Songs >> https://googledrive.com/host/0B-qdXDrTpme3SFhfUExZRkttWGc/
Andriod Apk >> https://googledrive.com/host/0B-qdXDrTpme3SXdtdE5MczFNSTQ/
သူငယ္ခ်င္းမ်ား အားလံုးပဲ အစစ အရာရာ အဆင္ေျပျပီး ေပ်ာ္ရႊင္ႀကပါေစလို႕ ဆုေတာင္းေပးပါတယ္....။
credit to - သူရိန္လင္း
Friday, January 31, 2014
Folder ေတြကို လံုၿခံဳေအာင္ ထားေပးမဲ့ Folder Guard (2MB)

www.aungkyaw.net
ရွားေလာ့ဟုမ္း (ေဆာ့၀ဲလ္ၿမိဳ႕ေတာ္)
Computer အတြက္လုပ္ေဆာင္သင့္ေသာနည္းလမ္းမ်ား (၅)

အားလုံးမဂၤလာပါေနာ္... ခုတင္တဲ့နည္းလမ္းေလးကေတာ့ ကြ်န္ေတာ္ ေရးလက္စ ျဖစ္တဲ့ ကြန္ပ်ဴတာမွာ လုပ္ေဆာင္သင့္ေသာအခ်က္ေလးမ်ား ဆိုတဲ့ ထဲက အိုင္း (၅) ကိုဆက္လက္ေရးမွာ ျဖစ္ပါတယ္.. လိုအပ္ခ်က္ေလးမ်ားကို စုစည္းျပီး ၾကိဳးစား ေရးသားထားပါတယ္.. မျပည့္မစုံဘဲ လိုအပ္ေနခဲ့ပါက... ေက်းဇဴးျပဳျပီး ထပ္မံျဖည့္စြက္ကာ ေလ့လာေပးၾကဖို႕ ေတာင္းဆိုပါရေစ...ေနာ္...
ကဲစမယ္ေနာ္... ပထမဆုံး မိမိတို႕ ကြန္ပ်ဴတာရဲ႕ Win + R ကိုတြဲကလစ္ကာ Run Box ေခၚလုိက္ပါေနာ္.
သည္နည္းကေတာ့ ့ Start Type ေတြနဲ႕ မလိုအပ္တဲ့ Services အခ်ိဳ႕ကိုပိတ္ထားမွာျဖစ္ပါတယ္
ဒီေတာ့ ကၽြန္ေတာ္တို႕ Run ထဲကေန “msconfig” လို႕ရိုက္လိုက္ပီး System Configurationကိုသြားရမွာျဖစ္ပါတယ္...ေနာ္...ကဲစျပီေနာ္..
ဒီေတာ့ ကၽြန္ေတာ္တို႕ Run ထဲကေန “msconfig” လို႕ရိုက္လိုက္ပီး System Configurationကိုသြားရမွာျဖစ္ပါတယ္...ေနာ္...ကဲစျပီေနာ္..

အဲလို ထည့္လိုက္တာနဲ႕ဘဲ System Configuration ဇယားက်လာပါျပီ

ဇယားရဲ႕ အေပၚက Startup ဆိုတာကိုကလစ္ေပးလိုက္ပါေနာ္.. ေနာက္ က်လာတဲ့ ထဲက မလိုအပ္တာေတြကို အကုန္ အမွန္ျခစ္ ျဖဳတ္ေပးလိုက္ပါ... အားလုံးကို Disable all ဆိုျပီး အမွန္ျဖစ္အားလုံး ျဖဳတ္ထားလည္း ျပႆနာမရွိဘူးေနာ္ မိမိတို႕သေဘာပါ က်ေနာ္ကေတာ့ ၃..၄...ခုေလာက္ဘဲ ထားပါတယ္.. ပုံမွာ နမူနာၾကည့္ေစျခင္လို႕ လုပ္ျပထားတာပါ... သူက ၀င္းဒိုးတက္တာကို ေလးလံေစပါတယ္... ဒါေၾကာင့္ မလိုအပ္ပါက အမွန္မျခစ္ဖို႕ ေျပာျခင္ပါတယ္...
ကဲ ျပီးတာနဲ႕ Apply ေလးဘဲေပးထားလုိက္ပါ... OK မလိုေသးဘူးေနာ္ သည္ေနရာမွာဘဲ လုပ္စရာေတြ ရွိေနပါေသးတယ္...ဆက္ၾကမယ္...
Boot ကိုကလစ္လုိက္ပါ.....အေပၚ ကဘဲေနာ္...ေစာေစာက Startup လိုမ်ိဳးေပါ့ေနာ္..
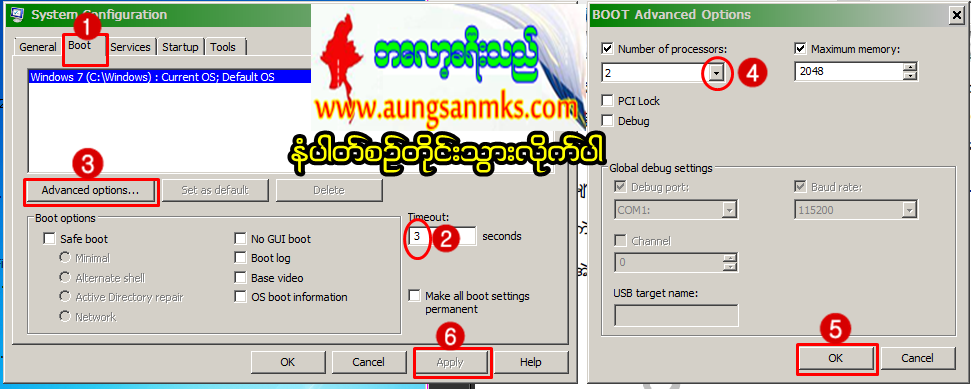
Boot ထဲေရာက္တာနဲ႕ ပထမ ညာဘက္က နံပါတ္ (၂) ေနရာက Timeout ေနရာမွာ 3 seconds ကိုဘဲထားေပးလိုက္ပါေနာ္...ဘာလို႕လည္းဆိုေတာ့ ၀င္းဒိုးတက္တက္ခ်င္း
ေရြးခ်ယ္စရာ (Dual Boot တင္ထားတယ္ဆိုရင္ေပ့ါ) OS ေတြရွိရင္ေတာ့ 3 စကၠန္႕ပဲသတ္မွတ္
ထားတဲ့အတြက္ေၾကာင့္ ၀င္းဒိုးအတက္ကိုျမန္ဆန္ေစပါတယ္။ေနဦး ေနာက္ နံပါတ္ (၃) Advanced options ဆိုတာကိုကလစ္လိုက္ပါ...
ေရြးခ်ယ္စရာ (Dual Boot တင္ထားတယ္ဆိုရင္ေပ့ါ) OS ေတြရွိရင္ေတာ့ 3 စကၠန္႕ပဲသတ္မွတ္
ထားတဲ့အတြက္ေၾကာင့္ ၀င္းဒိုးအတက္ကိုျမန္ဆန္ေစပါတယ္။ေနဦး ေနာက္ နံပါတ္ (၃) Advanced options ဆိုတာကိုကလစ္လိုက္ပါ...
ကလစ္တာနဲ႕ ညာဘက္က ဇယားေလး တခု ထပ္က်လာမွာ ျဖစ္ပါတယ္... က်လာတဲ့ထဲက.. NumberProcessors ဆိုတာမွာ အမွန္ျခစ္ပါ သူ႕ထဲမွာ နံပါတ္ ဘယ္တိုင္းတာ ထိပါလဲ ေနာက္က မွ်ားေလးကိုကလစ္ၾကည့္ပါ ပါလာတဲ့ ထဲက အျမင့္ဆုံးနံပါတ္ ထိ ထားေပးလိုက္ပါ..အေနာ့္စက္ကေတာ့
1-2 ဘဲပါေတာ့ 2 ဆုိတာ ထားလုိက္ပါတယ္.. တခ်ိဳ႕ဆို 1-2-3-4- ဆိုတဲ့ထိ ပါလိမ့္မယ္.. အျမင့္ဆုံးကိုသာေရြးခ်ယ္ေပးလိုက္ပါေနာ္..ျပီးတာနဲ႕ ညာဘက္ကဇယားကို ok ေပးလိုက္ပါ..
မထြက္နဲ႕အုံးေနာ္ ပင္မ System Configuration ဇယားးကေန ေပါ့..က်န္ေတးတယ္..ေိေိ
Service ဆိုတာကိုကလစ္လိုက္ပါ

Services ကိုေရာက္တာနဲ႕ အေပၚပုံပါ သူလည္း အေပၚဆုံးက Stratup တုန္းကလိုေပါ့... မိမိတို႕ မလိုအပ္ေသာ အရာမ်ားကို အမွန္ျခစ္ ျဖဳတ္ေပး၇မွာ ျဖစ္ပါတယ္.....ျပီးတာနဲ႕ Apply/Ok ရျပ္ီေနာ္ ထြက္လို႕..ေိေိ
သည္လို နည္းလမ္းေလးေတြ လုပ္ေပးချင္းျဖင့္ မိမိတုိ႕ ကြန္ပ်ဴတာေလးလည္း လန္းဆန္းေပါ့ပါးလာလိမ့္မယ္ဆိုတာ ယုံၾကည္ ေမွ်ာ္လင့္ျခင္းျဖင့္... အဆင္ေျပနိဳင္ၾကပါေစေနာ္....
credit to - ဘေလာ့ခရီးသည္
Facebook Account ရဲ႕ Password ၾကည့္ႏိုင္တဲ့ - Facebook Password Extrator

ကၽြန္ေတာ္ဒီေဆာ့၀ဲေလးကို မတင္ေပးခ်င္ပါဘူး
ဒါေပမယ့္ ဘာေၾကာင့္ တင္ေပးလိုက္သလဲဆိုေတာ့
အင္တာနက္ဆိုင္ေတြမွာ Facebook သံုးေနတဲ့
သူငယ္ခ်င္းေတြအေနနဲ႔ သတိထားစရာေလးရွိေအာင္
တင္ေပးလိုက္တာပါ ..
ဒီေဆာ့၀ဲေလးကို စမ္းသံုးၾကည့္ၿပီးရင္ Browser ထဲမွာ ၀င္သံုးထားတဲ့ အေကာင့္တစ္ခုဟာ ဘယ္ေလာက္အထိလံုၿခံဳမႈ အားနည္းတယ္ဆိုတာကို သိၿပီး ရွင္းလင္းစရာရွိတာေတြကို
သတိတရနဲ႔ ရွင္းလင္းထားခဲ့ဖို႔ မေမ့ေစခ်င္လို႔ပါ ..
ေဒါင္းၿပီးရင္ ကြန္ပ်ဴတာထဲမွာ Install လုပ္ၿပီး Run လိုက္တာနဲ႔ ေအာက္ကပံုအတိုင္း ပြင့္လာပါမယ္

အဲဒီထဲက Close ကိုႏွိပ္ေပးလိုက္တာနဲ႔ ကြန္ပ်ဴတာထဲမွာရွိေနတဲ့ အေကာင့္ေတြရဲ႕ user name နဲ႔ password ေတြ က်လာပါလိမ့္မယ္ ...
** Step-1.ေအာက္က Download Button ကိုႏွိပ္လိုက္ပါ
** Step-2. "5sec". ေလာက္ေစာင္႕ေပးပါ။
** Step-3. " << SKIP AD >> ".ကိုႏွိပ္ေပးပါ။
** Step-4. Download Link က်လာပါလိမ္႕မယ္။
** အဆင္ေျပပါေစဗ်ာ။
Function Keys နဲ႔ ပတ္သက္သမွ် ေလ့လာမယ္
- Almost always used as the help key, almost every program will open the help screen when this key is pressed.
- Enter CMOS Setup.
- Windows Key + F1 would open the Microsoft Windows help and support center.
- Open the Task Pane.
F2
- In Windows renames a highlighted icon, file, or folder in all versions of Windows.
- Alt + Ctrl + F2 opens document window in Microsoft Word.
- Ctrl + F2 displays the print preview window in Microsoft Word.
- Quickly rename a selected file or folder.
- Enter CMOS Setup.
F3
- Often opens a search feature for many programs including Microsoft Windows when at the Windows Desktop..
- In MS-DOS or Windows command line F3 will repeat the last command.
- Shift + F3 will change the text in Microsoft Word from upper to lower case or a capital letter at the beginning of every word.
- Windows Key + F3 opens the Advanced find window in Microsoft Outlook.
- Open Mission Control on an Apple computer running Mac OS X.
F4
- Open find window in Windows 95 to XP.
- Open the address bar in Windows Explorer and Internet Explorer.
- Repeat the last action performed (Word 2000+)
- Alt + F4 will close the program window currently active in Microsoft Windows.
- Ctrl + F4 will close the open window within the current active window in Microsoft Windows.
F5
- In all modern Internet browsers pressing F5 will refresh or reload the page or document window.
- Open the find, replace, and go to window in Microsoft Word.
- Starts a slideshow in PowerPoint.
F6
- Move the cursor to the Address bar in Internet Explorer, Mozilla Firefox, and most other Internet browsers.
- Ctrl + Shift + F6 opens to another open Microsoft Word document.
F7
- Commonly used to spell check and grammar check a document in Microsoft programs such as Microsoft Word, Outlook, etc.
- Shift + F7 runs a Thesaurus check on the word highlighted.
- Turns on Caret browsing in Mozilla Firefox.
F8
- Function key used to enter the Windows startup menu, commonly used to access Windows Safe Mode.
F9
- Opens the Measurements toolbar in Quark 5.0.
- With Mac OS 10.3 or later shows all open Windows.
- Using the Fn key and F9 at the same time will open Mission Controlon an Apple computer running Mac OS X.
F10
- In Microsoft Windows activates the menu bar of an open application.
- Shift + F10 is the same as right-clicking on a highlighted icon, file, or Internet link.
- Access the hidden recovery partition on HP and Sony computers.
- Enter CMOS Setup.
- With Mac OS 10.3 or later shows all open Windows for active program.
F11
- Full-screen mode in all modern Internet browsers.
- Ctrl + F11 as computer is starting to access the hidden recovery partition on many Dell computers.
- Access the hidden recovery partition on eMachines, Gateway, and Lenovo computers.
- With Mac OS 10.4 or later hides all open windows and shows theDesktop.
F12
- Open the Save as window in Microsoft Word.
- Shift + F12 save the Microsoft Word document.
- Ctrl + Shift + F12 prints a document in Microsoft Word.
- Preview a page in Microsoft Expression Web
- Open Firebug.
- With an Apple running Mac OS 10.4 or later F12 will show or hides the Dashboard.
credit to- မိုး
Windows 8 110 shortcuts hot keys

1) Windows key : Access the Start screen
2) Windows+D : Access the Desktop.
3) Windows+C : Show the Charms.
4) Windows+Q (or just start typing when you are on the Start menu) : Search
5) Windows+H : Share
6) Windows+K : Start Windows Devices
7) Windows+I : Settings
Tip: When you’re ready to shut down your computer, use Windows+I and then click or tap the Power button, found on the bottom right.
8) Windows+Z : Show the App Bar while in any app.
9) Windows+Tab or Alt+Tab : Cycle through open apps.
10) Zoom in and out : Ctrl+- to zoom out and Ctrl++ to zoom in
11) Windows+period : Snap an app to one side of the screen : .
Tip: You’ll find that many of the traditional shortcuts you’ve always used still exist, such as Windows+L to lock and Windows+P to project to another display.
12) Start Screen : Windows Key
13) Right Shift key : If you press it for eight seconds, it turns on Filter Keys. If you press it five times in a row, it turns on Sticky Keys.
14) Ctrl+mouse wheel : When used on the desktop, it changes the size of your desktop icons. When used on the Start screen, it zooms in and out.
15) Ctrl+A : Select all.
16) Win+C : Open the charms.
17) Ctrl+C : Copy.
18) Win+D : Show the desktop.
19) Alt +D : Select the address bar in Internet Explorer.
20) Ctrl+Alt +D : Enable the Docked mode in the Magnifier tool.
21) Win+E : Open File Explorer.
22) Ctrl+E : Select the search box in File Explorer.
23) Win+F : Show Files in the Search charm.
24) Win+Ctrl+F : Open the Find Computers window, which can find computers on a network (used mostly in business networks).
25) Win+G : Cycle through desktop gadgets.
26) Win+H : Open the Share charm.
27) Win+I : Open the Settings charm.
28) Ctrl+Alt +I : Invert colors in the Magnifier tool.
29) Win+J : Switch the focus between snapped apps and larger apps.
30) Win+K : Open the Devices charm.
31) Win+L : Lock the computer and display the Lock screen.
32) Ctrl+Alt +L : Enable Lens mode in the Magnifier tool.
33) Win+M : Minimize all the windows on the desktop.
34) Ctrl+N : Open a new File Explorer window.
35) Ctrl+Shift +N : Create a new folder in File Explorer.
36) Win+O : Change the Lock screen orientation.
37) Win+P : Open the project options for a second screen.
38) Win+Q : Open the Search charm.
39) Win+R : Open the Run window.
40) Ctrl+R : Refresh.
41) Win+T : Set the focus on the taskbar and cycle through the running desktop apps.
42) Win+U : Launch the Ease of Access Center.
43) Win+V : Cycle through notifications.
44) Win+Shift +V : Cycle through notifications in backward order.
45) Ctrl+V : Paste.
46) Win+W : Open Settings in the search charm.
47) Ctrl+W : Close the current window. It works only in desktop apps.
48) Win+X : Open the hidden system menu.
49) Ctrl+X : Cut.
50) Ctrl+Y : Redo.
51) Win+Z : Opens the app bar. It works only in Windows 8 apps.
52) Ctrl+Z : Undo.
53) Win+keys from 1 to 9 : Display the app at the given position on the taskbar.
54) Win++ (plus sign) : Zoom in while using the Magnifier tool.
55) Win+- (minus sign) : Zoom out while using the Magnifier tool.
56) Win +, (comma) : Peek at the desktop.
57) Win+. (period) : Snap a Windows 8 app to the right.
58) Win+Shift +. (period) : Snap a Windows 8 app to the left.
59) Win+Enter : Launch Narrator.
60) Win+Alt +Enter : Launch Windows Media Center if installed.
61) Alt + Enter : Open the Properties window for the item selected in File Explorer.
62) Space : Select or clear an active check box.
63) Win+Space : Switch the input language and keyboard layout.
64) Alt +Space : Open a shortcut menu in desktop applications.
65) Tab : Move forward through options.
66) Win+Tab : Cycle through Windows 8 app history.
67) Win+Ctrl+Tab+Arrow keys : Cycle through Windows 8 app history in the direction you specify by using the arrow keys.
68) Ctrl+Tab : Cycle through Windows 8 app history (identical to Win+Tab).
69) Alt +Tab : Switch between opened apps (including desktop apps).
70) Shift +Tab : Move backward through options.
71) Ctrl+Alt +Tab+Arrow keys : Switch between opened apps (including desktop apps) in the direction you specify by using the arrow keys.
72) Esc : Cancel.
73) Win+Esc : Exit the Magnifier tool.
74) Ctrl+Esc : Show the Start screen.
75) Ctrl+Shift +Esc : Launch Task Manager.
76) PrtScn : Copy an image of your screen to the Clipboard.
77) Left Alt +Left Shift +PrtScn : Turn on High Contrast.
78) NumLock : Press for five seconds to turn on Toggle Keys.
79) Ctrl+Insert : Copy (alternative to Ctrl+C).
80) Shift +Insert : Paste (alternative to Ctrl+V).
81) Win+Home : Minimize inactive desktop windows.
82) Win+PageUp : Move the Start screen to the left monitor.
83) Win+PageDown : Move the Start screen to the right monitor.
84) Win+Break : Open the System Properties window.
85) Left arrow : Open the previous menu or close the current submenu.
86) Win+Left arrow : Snap the active desktop window to the left.
87) Win+Shift +Left arrow : Snap the active desktop window to the left monitor.
88) Ctrl+Left arrow : Show the previous word or element.
89) Alt +Left arrow : Show the previous folder in File Explorer.
90) Ctrl+Shift +Left arrow : Select a block of text from the current cursor position to the left.
91) Right arrow : Open the next menu or submenu.
92) Win+Right arrow : Snap the active desktop window to the right.
93) Win+Shift +Right arrow : Snap the active desktop window to the right monitor.
94) Ctrl+Right arrow : Show the next word or element.
95) Ctrl+Shift +Right arrow : Select a block of text from the current cursor position to the right.
96) Win+Up arrow : Maximize the active desktop window.
97) Win+Shift +Up arrow : Maximize the active desktop window and keep the current width.
98) Ctrl+Up arrow : Show the previous paragraph.
99) Alt +Up arrow : Advance up one level in File Explorer.
100) Ctrl+Shift +Up arrow : Select a block of text.
101) Win+Down arrow : Minimize the active desktop window.
102) Win+Shift +Down arrow : Minimize the active desktop window and keep the current width.
103) Ctrl+Down arrow : Advance to the next paragraph.
104) Ctrl+Shift +Down arrow : Select a block of text.
105) F1 : Display Help if available.
106) Win+F1 : Launch Windows Help and Support.
107) F2 : Rename the selected item.
108) F3 : Search for a file or folder.
109) F4 : Display items in the active list (works only for desktop apps).
110) Ctrl+F4 : Close the active document.
111) Alt +F4 : Close the active item or app.
112) F5 : Refresh.
ေလးစားစြာျဖင့္
မိုး
Subscribe to:
Posts (Atom)
